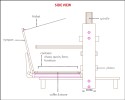
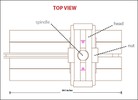
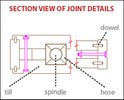
The following diagrams show the Beaver Press from various angles.
All definitions are taken from A Dictionary of the Art of Printing by William Savage, unless otherwise indicated. This work is in the public domain.
Making the Beaver Press
This design for the Beaver Press reflects the instructors’ desire to enable students to build a functioning press over the course of a single semester. It assumes that students have access to a woodworking shop.
Although there are no historical drawings for very early printing presses, we know that they were made almost entirely of wood. My experience in the MIT Hobby Shop told me that wood would be the most practical material for the structure, and we were fortunate to have some large pieces of longleaf pine reclaimed from an old mill building. Longleaf pine is both strong and hard, more like oak than other soft pines.
Because of the time constraints and the need for high precision, we contracted with Lake Erie Toolworks to custom-make the large-diameter, steep-pitched wood screw and nut. This is the critical moving part which presses the paper onto the type and is difficult to make.
The tower frame that holds the screw and nut uses joints that are aligned with wooden dowels and held together with steel hex head bolts. These are strong and easy to take apart and reassemble when necessary. They are also relatively easy to make. The drawings show to scale the press as it was built in the shop. Working the press produces large forces that require a strong frame, but the particular dimensions of the Beaver Press parts were the result of making the best use of the wood we had. Anyone wanting to make their own press should do the same, keeping basic structural needs in mind.
The frisket and tympan assembly, which align pages and allow for printing on both sides of a sheet of paper, were added in the second teaching of the class. They both use continuous hinges for strength and durability. The drawing shows them in the closed and partially open positions.
The bed or “coffin” of the press, onto which the form containing the type is positioned, has a stone base (as it might have been in some early presses). For this we used a granite paver, facing the smooth side up.
The parts of the press colored gray in the drawing are made of metal, another probable change from early historical presses. Instead of tightly drawn cords or thin ropes (as in a traditional press), we used springs to secure the platen to the hose in a horizontal position. The hose or hose assembly is the cube-shaped block that acts as the bottom hub for the screw. It moves up and down with the screw but doesn't rotate. It also holds the platen against the bottom of the screw.
How the Press Works
The type is hand-set to make the form as desired to produce a printed page. The form is then secured on the coffin held in the chase with furniture and quoins. He type is then inked, and a piece of paper is then placed on the tympan and secured by the frisket. Pulling the handle lowers the platen and presses the paper against the inked type.
This methodical process requires careful attention and may seem slow and painstaking now, but it allowed many identical copies of a work to be produced. Compared with the expensive and time-consuming hand copying of individual manuscripts, each one prone to multiple and unpredictable human errors, it represented a huge advance in technology.
Ken Stone: Designer


