
< Previous lab day | Module 1 lab index | Next lab day >
Introduction
Today you will purify your two aptamer-encoding DNA fragments in preparation for performing an in vitro transcription (IVT) reaction that will copy the DNA into RNA. IVT requires specific conditions, so we want to remove everything but our DNA fragment from the PCR mixtures (e.g., excess dNTPS), and also change from the PCR buffer into pure water. To accomplish this clean-up, we will first run our entire reaction mixtures through a gel, then excise the band of the correct size (~129 bp).
Gel electrophoresis is a technique used to separate large molecules by size using an applied electrical field and appropriate sieving matrix. DNA fragments are typically separated in gels composed of agarose, a seaweed-derived polymer (see figure, below left). To prepare these gels, molten agarose is poured into a horizontal casting tray containing a comb. Once the agarose has solidified, the comb is removed, leaving wells into which the DNA sample can be loaded. The loaded DNA samples are then pulled through the matrix when a current is applied across it. Specifically, DNA molecules are negatively charged due to their phosphate backbones, and thus travel toward the positive charge at the far end of the gel (see figure, below right).
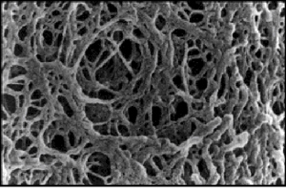
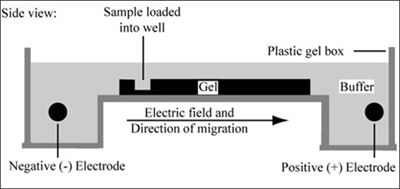
Left: Scanning electron microscope image of agarose polymer. (© source unknown. All rights reserved. This content is excluded from our Creative Commons license. For more information, see http://ocw.mit.edu/fairuse). Right: Diagram of agarose gel setup, for agarose gel electrophoresis. (Figure by MIT OpenCourseWare.)
Although all DNA molecules travel in the same direction during gel electrophoresis, they do so at different rates: larger molecules get entwined in the matrix and retarded, while smaller molecules wind through the matrix more quickly and thus travel further from the well. Ultimately, fragments of similar length accumulate into "bands" in the gel. Bands of DNA are usually visualized by adding the fluorescent dye ethidium bromide to agarose gels. This dye intercalates between the bases of DNA, allowing DNA fragments to be located in the gel under UV light and photographed. The intensity of the band reflects the concentration of molecules that size, although there are upper and lower limits to the sensitivity of dyes. Because of its interaction with DNA, ethidium bromide is a powerful mutagen and will interact with the DNA in your body just as it does with any DNA on a gel. You should always handle all gels and gel equipment with nitrile gloves. Agarose gels with ethidium bromide must be disposed of as hazardous waste.
One parameter that affects the way DNA travels through a gel is the pore size, which is in turn affected by both the weight percent of the gel and the type of agarose used. Because we are separating small DNA fragments (~ 0.1 Kbp), a high percentage (namely 3%) gel is appropriate. For bands 10-50 times this size, a 1% gel would typically be used. We will use a high-resolution (HR) agarose; its low viscosity means that high weight percent solutions are tractable to work with, and that the solidified gel remains pliable rather than brittle. HR agarose can be prepared by chemically modifying and/or partially depolymerizing natural agarose (as described in this patent).
You will melt the agarose gel bands, then isolate the DNA by using a silica (SiO2) column. The column is packed with a silica resin (i.e., beads). The beads have a high ratio of surface area to volume and contain small pores, both qualities that allow them to interact with specific molecules. When nucleic acids are diluted in a high concentration of a chaotropic salt buffer, they will tend to bind to the silica. This is because chaotropic salts (such as guanidine isothiocyanate) disrupt hydrogen-bond organization between water and macromolecules, essentially dehydrating the nucleic acids and causing them to bind to the resin. Ethanol further precipitates the nucleic acids. The column-bound acids are washed with various buffers to remove salts and other contaminants before finally eluting in pure water, in which nucleic acids are highly soluble. The exact pore size and surface chemistry of the silica beads determine what sizes and kinds of nucleic acid will be bound versus washed away. In our case DNA between about 70 and 10,000 bp will be eluted.
Protocols
Part 1: Run PCR Products on Gel
You will use a 3% agarose gel to run your three PCRs from last time, as well as a reference lane of molecular weight markers (also called a DNA ladder).
- Put 40 μL of each reaction from last time (6-5, 8-12, and no template control) into a separate eppendorf tube.
- If a reaction has less than 40 μL due to evaporation, take the maximum amount you can and write it down.
- Add 4 μL of loading dye to the PCR aliquots.
- Loading dye contains xylene cyanol as a tracking dye to follow the progress of the electrophoresis (so you don't run the smallest fragments off the end of your gel!) as well as glycerol to help the samples sink into the well.
- Flick the eppendorf tubes to mix the contents, then quick spin them in the microfuge to bring the contents of the tubes to the bottom.
- To quick-spin, hold down the "short" button on your centrifuge for 3-5 seconds, then release.
- Load the gel according to the table below. Up to 4 groups will share each gel: 2 groups per lane. o To load your samples, draw 40 μL into the tip of your P200. Lower the tip below the surface of the buffer and directly over the well. You risk puncturing the bottom of the well if you lower the tip too far into the well itself (puncturing well = bad!). Expel your sample into the well. Do not release the pipet plunger until after you have removed the tip from the gel box (or you'll draw your sample back into the tip!).
- Once all the samples have been loaded, we will attach the gel box to the power supply and run at 100 V for 60 minutes.
- Later you will be shown how to photograph your gel and excise the relevant bands of DNA. Begin by anticipating where you expect to see your sample band relative to the bands of the DNA Ladder.
| LANE | SAMPLES | LANE | SAMPLES |
|---|---|---|---|
| 1 | DNA ladder (load 15 μL) | 6 | DNA ladder (load 15 μL) |
| 2 | Group 1, NTC | 7 | Group 2, NTC |
| 3 | Group 1, 6-5 | 8 | Group 2, 6-5 |
| 4 | Group 1, 8-12 | 9 | Group 2, 8-12 |
| 5 | BLANK | 10 | BLANK |
Sample Result
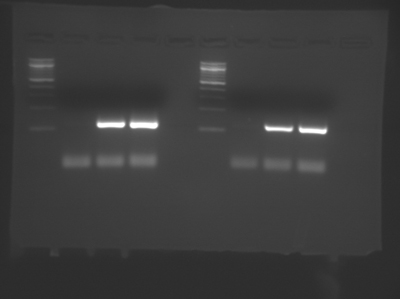
A sample DNA gel showing two group's data from Module 1, Day 2. Lanes 1 and 6 contain DNA standards of known length (New England BioLabs 100 bp DNA ladder). Lanes 3-4 and 8-9 show PCR products just above 100 bp in size, as expected. Lanes 2 and 7 show no product formation in the no template control (NTC) samples. The faint lines well below 100 bp are reaction components, not products. (Image courtesy of Ariana Chehrazi, Jacqueline Söegaard, and two anonymous MIT students.)
Part 2: Writing Across the Curriculum Session
While the gels run, you will have an introductory session with our writing faculty.They will provide a handout with exercises adapted from this book.
![]() Matthews, Janice R., John M. Bowen, and Robert W. Matthews. Successful Scientific Writing. 2nd ed. Cambridge, UK: Cambridge UP, 2005. ISBN: 9780521789622.
Matthews, Janice R., John M. Bowen, and Robert W. Matthews. Successful Scientific Writing. 2nd ed. Cambridge, UK: Cambridge UP, 2005. ISBN: 9780521789622.
- Improving readability – Ex. 5-3, p. 110 (3 exercises) [Preview in Google Books]
- Revising for brevity -- Ex. 5-6, p. 118 (5 exercises) [Preview in Google Books]
- Eliminating jargon -- Ex. 7-1, p. 144 (3 exercises) [Preview in Google Books]
- Punctuation -- Ex. 8-1, p. 172 (5 exercises) [Google Books preview not available]
Part 3: Purify DNA
To purify your DNA from the agarose, you will use a kit from the Qiagen company. The reagents in such commercial kits can have uninformative names and their contents are in part proprietary.
- Estimate the volume of your gel slices by weighing them.
- The easiest way to do this is to pre-weigh an eppendorf tube for each slice, then weigh it again after adding the gel, and take the difference.
- Add 3 volumes of QG for every 1 volume of agarose.
- The maximum advised volume is 550 μL. If are above this volume, continue for now, but first read steps 5 + 6 to understand how to proceed later. Feel free to ask the teaching faculty for clarification.
- Incubate in the 50°C water bath for 15 minutes, until the agarose is completely dissolved. Every few minutes, you should remove your tubes from the 50°C heat and vortex them for a few seconds to help dissolve the agarose.
- Add 1 volume - original gel volume, not current solution volume - of isopropanol to each eppendorf tube and pipet well to mix.
- Get two QIAquick columns and two collection tubes from the teaching faculty. Label the spin-column (not the collection tubes!) either "6-5" or "8-12" and then pipet the appropriate dissolved agarose mixture to the top. Microfuge the column in the collection tube for 60 seconds at maximum speed (approx. 16,000 rcf). The maximum capacity of the QIAquick columns is 800 uL! If you have more than 800 uL in your mixture, you will need to repeat this step using the same column.
- Discard the flow-through in the sink and replace the spin-columns in their collection tubes. Add 500 μL of QG to the top of the column and spin as before.
- Discard the flow-through again, then add 750 μL of PE to the top of the column and incubate for 5 min at room temperature.
- Spin for 1 min as before.
- Discard the flow-through in a temporary waste container such as a 15 mL conical tube (PE contains ethanol) and replace the spin-columns in their collection tubes.
- Add nothing to the top but spin for 60 seconds more to dry the membrane.
- This step completely removes remaining ethanol that could interfere with future reactions.
- Trim the cap off two new eppendorf tubes and prepare sticky labels (in your team color) for the top: write the date and either "6-5" or "8-12." You may also want to label the side of each tube, so you don't lose track of which sample is which in the following step.
- Place the labeled spin-column in its matching trimmed eppendorf tube and add 30 μL of pH 7 water to the center of the membrane.
- Do not add regular distilled water, as this is at a lower pH, which will lower elution efficiency.
- Allow the columns to sit at room temperature for one minute and then spin as before. The material that collects in the bottom of the eppendorf tubes is your purified aptamer-encoding DNA
For Next Time
- You will write up the work you do in Module 1 in a formal lab report, per the Guidelines for Writing Up Your Research. To help you pace your work, as well as give you feedback early on, you will be required to draft small portions of the report as homework assignments. For next time, you should write an early draft of your Materials and Methods: on PCR, gel electrophoresis, and DNA purification. Be sure to read the Methods section of the Guidelines before you begin.
- Finish preparing for the journal article discussion we will have next time.
Reagent List
- Agarose gels
- 2:1 mixture of high-resolution:standard agarose
- Prepared in TAE buffer
- With 0.8 μg/mL ethidium bromide
- Loading dye
- 0.25% xylene cyanol
- 30% glycerol
- RNase
- Gels made and run in 1X TAE buffer
- 40 mM Tris
- 20 mM Acetic Acid
- 1 mM EDTA, pH 8.3
- 100 bp DNA ladder from New England BioLabs
- QIAquick gel extraction kit
- silica spin columns
- QG and PE buffers
- Isopropanol