
< Previous lab day | Module 2 lab index | Next lab day >
Introduction
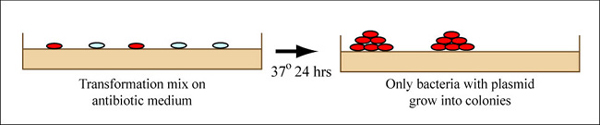
Bacterial transformation. (Figure by MIT OpenCourseWare.)
Assuming all went well, your reaction tubes from last time contain mutagenized DNA that encodes mutant inverse pericam. However, the desired DNA plasmid is likely present at a low concentration, and moreover it is nicked rather than in intact circular form. What we would like to do now is repair and further amplify only the mutagenized product. Thankfully, we have E. coli bacteria to do this for us quite efficiently!
Bacteria can take up foreign DNA in a process called transformation, during which a single plasmid enters a bacterium and, once inside, replicates and expresses the genes it encodes. Most bacteria do not exist in a transformation-ready state, but can be made permeable to foreign DNA by chemical treatment or other means. Cells that are capable of transformation are referred to as competent. Competent cells are extremely fragile and should be handled gently, i.e., kept cold and not vortexed. Bacterial transformation is efficient enough for most lab purposes, resulting in as many as 109 transformed cells per microgram of DNA, but even with highly competent cells only 1 DNA molecule in about 10,000 is successfully transformed. Thus we need a way to identify transformed cells, which is usually accomplished with antiobiotics. For example, the plasmid carrying inverse pericam (called pRSET) also carries a gene that leads to ampicillin-resistance. Consequently, a transformed bacterium will grow on ampicillin-containing agar medium, while untransformed cells will die before they can form a colony (see figure above right). Given the low concentration and nicked structure of your DNA to begin with, you should perform your transformations today with great care.
Before setting up transformations, you will test your mutagenized DNA for the presence and approximate concentration of product, by running your mutagenesis reaction mixtures (both before and after DpnI digestion) through an agarose gel. Because the product is several Kbp long, a standard 1% agarose gel will serve us just fine. The long mutant plasmid DNA should be separated from the short digested fragments of parental DNA and thus can be identified. However, the bands may be very faint. (Note that the parental plasmid is originally present at a concentration too low to detect on a gel.) If you do not see a band at the expected size of the mutant plasmid, you might increase the amount of DNA used during the transformation procedure at the end of lab.
Protocols
Part 1: Agarose Gel Electrophoresis
Using a 1% agarose gel prepared by the teaching faculty, you will run two samples and a reference lane containing standards of known molecular weight (also called a DNA ladder). Recall that You should always handle all gels and gel equipment with nitrile gloves.
- Set aside 10 μL of of your DpnI-digested product in eppendorf tubes. Save the rest of the digested DNA, keeping it on ice.
- Retrieve the aliquot of undigested sample that you prepared last time, and add 2 μL of loading dye to both 10 μL samples.
- Recall that loading dye contains xylene cyanol as a tracking dye and glycerol to help the samples sink into the well.
- Flick the eppendorf tubes to mix the contents, then quick spin them in the microfuge to bring the contents of the tubes to the bottom.
- Load the gel in the order shown in the table below, where U is undigested and D is the digested sample. Up to four groups will share each row of wells.
- We will use a 14-lane rather than a 10-lane gel, to concentrate the DNA into a smaller area.
- To load your samples, draw 11 μL into the tip of your P20. Lower the tip below the surface of the buffer and directly over the well. Expel your sample into the well. Do not release the pipet plunger until after you have removed the tip from the gel box.
- Once all the samples have been loaded, the teaching faculty will attach the gel box to the power supply and run the gel at 100 V for 45 minutes.
| LANE | SAMPLE | LANE | SAMPLE |
|---|---|---|---|
| 1 | Group 1, U | 8 | Parent IPC |
| 2 | Group 1, D | 9 | BLANK |
| 3 | BLANK | 10 | Group 3, U |
| 4 | Group 3, D | 11 | Group 2, 8-12 |
| 5 | Group 2, D | 12 | BLANK |
| 6 | BLANK | 13 | Group 4, U |
| 7 | DNA Ladder | 14 | Group 4, D |
While the gel runs, you can label the tubes you will need later, work on your notebooks, start the FNT assignment, etc.
Be sure to pre-chill your 14 mL tubes on ice for at least a few min before adding competent cells to them.
Part 2: Gel Analysis
- The teaching faculty will photograph and post a digital image of the gel.
- In the following analysis, you will need the information for the 1 Kbp DNA ladder you used.
- First, see if you got a band at the expected size of the pRSET plasmid with an inverse pericam insert, or ~ 4 Kbp.
- If you did not get a band, you should use 2-3x the usual recommended DNA amount in your mutant transformation.
- If you did get a band, estimate the approximate amount of DNA in that lane in ng (by comparing to the ladder standards), then the concentration in ng/μL (based on the sample volume that you loaded). Write this information in your notebook.
Part 3: Bacterial Transformation
You will transform competent cells called XL1-Blue with your X#Z mutagenesis reactions and plate them on ampicillin-containing Petri dishes. Tomorrow, two candidate colonies will be chosen from each group's plate. The efficiency of this mutagenesis protocol is reported to be ~80%. We will test two candidates per mutation to cover our bases, so to speak.
- Get an aliquot of competent cells from one of the teaching faculty. Keep these cells on ice at all times, allowing them to thaw slowly (over a few minutes).
- Label three 14 mL polypropylene round-bottom tubes as follows: (-) control, (+) control, X#Z.
- The negative control will receive no DNA, but otherwise go through all the following steps.
- The positive control for you is the pre-tested M124S teaching sample. Normally, a control that comes with the mutagenesis kit we used on Day 2 would be used. Be sure to use a fresh pipet tip when taking from the positive control stock DNA!
- Add 50 μL of competent cells to each tube, followed by 2 μL of the appropriate DNA. Gently swirl (do not vortex) to mix, then incubate on ice for 10 min.
- Bring the tubes over to the 42 °C water bath, and immerse them for exactly 45 seconds according to your digital timer.
- Immediately return the cells to ice for 2 minutes, and take an aliquot of pre-warmed LB medium.
- Add 0.5 mL of warm LB to each sample, then move them to the 37 °C incubator. Ask the teaching faculty to show you how to operate the roller and balance your tubes.
- Allow the cells to recover and begin expressing ampicillin resistance for 30 minutes. At the same time, pre-warm and dry three LB+AMP plates by placing them in the 37°C incubator, media side up with the lids ajar.
- Plate 250 μL of each transformation mix on LB+AMP plates. After dipping the glass spreader in the ethanol jar, you should pass it through the flame of the alcohol burner just long enough to ignite the ethanol. After letting the ethanol burn off, the spreader may still be very hot, and it is advisable to tap it gently on a portion of the agar plate without cells in order to equilibrate it with the agar (if it sizzles, it's way too hot). Once the plates are ready, wrap them together with one piece of colored tape and incubate them in the 37°C incubator overnight. One of the teaching faculty will remove them from the incubator and set up liquid cultures for you to use next time.
Part 4: Prepare Tubes for Liquid O/N Cultures
You will make your teaching faculty very happy if you contribute to their preparatory work. Please label 2 large glass test tubes with your team color and sample name (X#Z-1, X#Z-2). Mix 10 mL LB with 10 μL of ampicillin. Aliquot 2.5 mL of LB+Amp per tube. These will be used to set up liquid overnight cultures from your two colonies for next time.
For Next Time
- The pRSET plasmid with inverse pericam insert, or pRSET-IPC, is 4169 basepairs long. According to the cutters list (PDF) that you used on Day 1, restriction site PvuI occurs at ~1685 bp, and again at ~2730 bp into pRSET-IPC. Thus, digesting this parental plasmid with the PvuI enzyme should result in two linear fragments of DNA, with about 1050 and 3120 bp sizes.
A silent mutation can be introduced that results in a new PvuI site at the 341st-342nd residues of inverse pericam (ATT → ATC and TAC → GAC) , or approximately the 1020th basepair of IPC. When IPC is inserted into pRSET, its starting point is ~200bp into the pRSET plasmid. Thus, if the mutated pRSET-IPC plasmid is digested with PvuI, three linear fragments of DNA are the result: 470, 1050, and 2660 bp. To understand these calculations, see also the plasmid maps below. Make sure you can reproduce the numbers above before proceeding with your own samples.
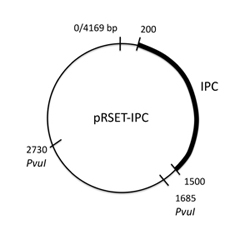
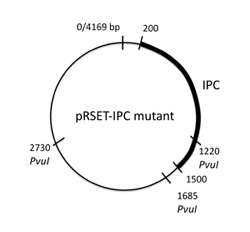
Left: IPC plasmid map (Q1). Right: Mutant plasmid map (Q1)
For this assignment, you should plan restriction enzyme digests that allow you to distinguish parental and mutant pRSET-IPC for M124S and for your X#Z mutation. You are probably best off doing a single enzyme digest for this particular experiment. However, in other kinds of experiments (notably cloning) using two enzymes per digest can give more information. Note: the M124S primer information is now on the Day 2 Talk page.
(A) Use NEB's NEBuffer Activity Chart for Restriction Enzymes to determine the appropriate buffer and temperature for your reactions.
(B) In addition to giving the reaction conditions for each digest, you should explicitly show how the digest distinguishes between parent and mutant. In other words, what are the expected band sizes for each upon digestion?
- Consider a mutant pRSET-IPC with a newly introduced NotI restriction site that did not occur at all on the parental plasmid (zero cutter). After digestion, you see banding patterns that indicate an uncut plasmid (supercoiled and circular) rather than a linearized piece of DNA for both the parental and the mutant plasmid. Your lab partner tells you that the mutagenesis reaction must not have worked, and that the so-called mutant couldn't possibly contain a NotI site. What's an equally valid interpretation of this data?
Reagent List
- QuikChange II Site-Directed Mutagenesis Kit from Stratagene
- XL1-Blue supercompetent cells
- LB (Luria-Bertani broth)
- 1% Tryptone
- 0.5% Yeast Extract
- 1% NaCl
- autoclaved for sterility
- Ampicillin: 100 mg/mL, aqueous, sterile-filtered
- LB+AMP plates
- LB with 2% agar and 100 μg/ml Ampicillin